|
Software Development Magazine - Project Management, Programming, Software Testing |
|
Scrum Expert - Articles, tools, videos, news and other resources on Agile, Scrum and Kanban |
Owl - Open Source RSpec Test Reporting Tool
Haris Suljovic, Atlantbh, https://www.atlantbh.com/
Owl is an open source tool used for the reporting and presentation of tests results achieved using the RSpec open source testing tool. It stores the test results in a PostgreSQL database and provides features to report them.
Website: https://github.com/ATLANTBH/owl
License & Pricing: CasperJS is licensed under Apache License
Support: https://github.com/ATLANTBH/owl/issues
Getting started with Owl
This step by step guide will help you to successfully install and enable Owl for test results reporting and presentation. In this particular case, we will be installing Owl for presenting tests, written in Ruby and Rspec (testing tool for Ruby), created for behaviour driven development.
For purposes of this tutorial, we used a clean Amazon EC2 instance running Ubuntu 16.04.
Prerequisites
The first Owl prerequisite is that you need to have PostgreSQL database installed. Owl currently supports only PostgreSQL databases. The database needs to be started on the same machine where Owl will be installed, further in the text referred to as "localhost". So basically, we will only need to create our database and then later let the Owl create a schema that will be used. For these purposes, we created an additional role named ‘owluser’ and a database named ‘owldbtest’. You can do this using following commands:
Login to postgres with psql client:
sudo -i -u postgres
Log in to prompt interface with:
psql
(Or use the following command to login with custom postgres role:
psql -U <your_postgres_role> -d postgres -h 127.0.0.1 -W)
Create a new database with:
CREATE DATABASE <database_name>; In order to use Owl with Rspec, you need to include 'rspec2db' gem in your tests. This gem is a database formatter which enables writing RSpec test results into our database. See Rspec2db GitHub repo for more information: https://github.com/ATLANTBH/rspec.
In case you already used rspec2db and now you want to integrate it with Owl, you will need to run alter migration that will alter the existing tables and add the needed columns for Owl. You can read more about this approach at the end of the article.
To run the Owl application, Java (JRE) needs to be installed (You'll have to set JAVA_HOME environment variable too). And also, to build the application, there should be Maven (>= v3) installed.
Setup the Rspec project
Create new directory for rspec project, and initialise it with:
rspec —-init
After project initialisation, create config directory in your project and add rspec2db.yml file with following content populated:
Open .rspec file in your project and make sure it contains following lines:

Add a Gemfile to your project and add following gems:

Run bundle install.
Run RSpec tests using the following command (from the location where .rspec file exist, to be able to pick up parameters defined in .rspec):
bundle exec rspec spec spec/<TEST_SCRIPT_NAME> (Of course, you'll need to have some rspec tests in your spec folder to do this (See http://rspec.info/ to start writing tests in rspec).)
Install and start the Owl
Clone Owl repository:
git clone https://github.com/ATLANTBH/owl.git
Inside cloned directory, run:
mvn clean package
This will create target/owl-VERSION.jar file, and we will copy it to different location on our ec2 host, along with /src/main/resources/application.properties file to start it locally.
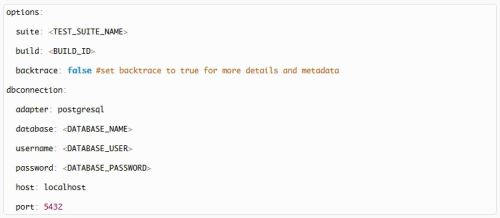
Open the application.properties file where we will edit our database configuration and other properties. We need to change the database name, username and password in the database properties, to match our properties. In addition, you can edit project name, test suite names or toggle specific features to suit your test suite. You can enable git information on the dashboard to show the exact commit on which the test was executed. There is also a bug tracking feature, which adds additional column to test steps, so you can add error description and i.e. link to your JIRA ticket. At the end, application.properties file should look something like this:

Note: Server port from needs to be enabled for listening, so that the application could be reached. In our case, we will be adding Custom TCP Rule in Security Groups on our Amazon EC2 instance. (Screenshot 1)
Start the application with your configuration by running:
java -jar owl-VERSION.jar --spring.config.location=<application.properties>
You should start the process with nohup, so it won't be killed when you logout:nohup java -jar owl-VERSION.jar --spring.config.location=<application.properties> &
To be sure that port is enabled and running our app, run netstat -nltp and you should get something like this:

So that's it! At this point, the application should be running on port 8090, or on your custom server port. Every test execution will be written to the database, and you can easily access it, formatted and segmented.
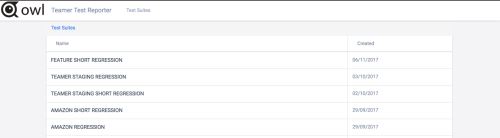
Once you open the Owl, you can navigate to your particular test suite:
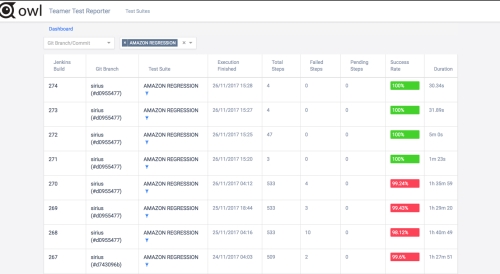
You can see the graph for the 'Amazon Regression' test suite with success percentage and complete duration of each test suite. The X axis represents build ID of the test suite (specified in the rspec2db.yml file), and Y axis represents the success rate:

Opening the particular build, you can see all specs executed in this particular test run:

From here you can open a single test and see all the test steps. You can see the description and the expected result, if it passed or not, as well as the duration of each step
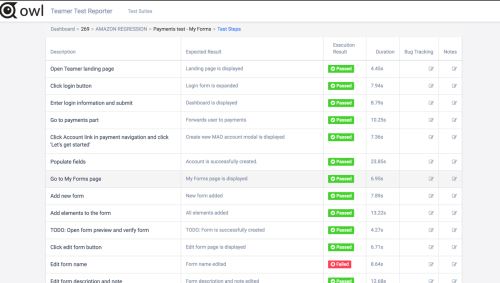
When the step fails, you can see the exception by clicking on 'Failed' execution result:

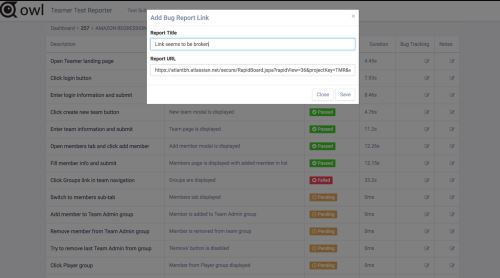
If you have enabled the option for bug tracking in the application.properties file, you can add a link to your bug tracking tool (i.e. JIRA) in 'Bug Tracking' column:
Note: If you already have a database schema generated with rspec2db, you can specify the flyway properties in the application.properties file. For example, if you have a database named 'testdb', simply add its properties to application.properties file:

And then run the flyway baseline migration with:
mvn flyway:baseline -Dflyway.configFile=<application.properties>
This way you will alter it for Owl usage.
Related Resources
This article was originally published in March 2018
|
Methods & Tools Testmatick.com Software Testing Magazine The Scrum Expert |
|
Browse a selected list of upcoming Software Development Conferences |
Copyright © by 1995-2024 Martinig & Associates |
Privacy
Follow Methods & Tools on


