|
Software Development Magazine - Project Management, Programming, Software Testing |
|
Scrum Expert - Articles, tools, videos, news and other resources on Agile, Scrum and Kanban |
Agile Development with ICONIX Process - Page 2
Doug Rosenberg, Matt Stephens and Mark Collins-Cope
Introduction
Sequence Diagram for "Create a New Customer"
Now that we've disambiguated our robustness diagram (and therefore also our use case text), let's move on to the sequence diagram (see Figure 3).

Figure 3. Sequence diagram for the Create a New Customer use case
More Design Feedback: Mixing It with TDD
The next stage is where the ICONIX+TDD process differs slightly from vanilla ICONIX Process. Normally, we would now move on to the class diagram, and add in the newly discovered classes and operations. We could probably get a tool to do this part for us, but sometimes the act of manually drawing the class diagram from the sequence diagrams helps to identify further design errors or ways to improve the design; it's implicitly yet another form of review.
We don't want to lose the benefits of this part of the process, so to incorporate TDD into the mix, we'll write the test skeletons as we're drawing the class diagram. In effect, TDD becomes another design review stage, validating the design that we've modeled so far. We can think of it as the last checkpoint before writing the code (with the added benefit that we end up with an automated test suite).
So, if you're using a CASE tool, start by creating a new class diagram (by far the best way to do this is to copy the existing domain model into a new diagram). Then, as you flesh out the diagram with attributes and operations, simultaneously write test skeletons for the same operations.
Here's the important part: the tests are driven by the controllers and written from the perspective of the Boundary objects.
If there's one thing that you should walk away from this article with, then that's definitely it! The controllers are doing the processing-the grunt work-so they're the parts that most need to be tested (i.e., validated that they are processing correctly). Restated: the controllers represent the software behavior that takes place within the use case, so they need to be tested. However, the unit tests we're writing are black-box tests (aka closed-box tests)-that is, each test passes an input into a controller and asserts that the output from the controller is what was expected. We also want to be able to keep a lid on the number of tests that get written; there's little point in writing hundreds of undirected, aimless tests, hoping that we're covering all of the failure modes that the software will enter when it goes live. The Boundary objects give a very good indication of the various states that the software will enter, because the controllers are only ever accessed by the Boundary objects. Therefore, writing tests from the perspective of the Boundary objects is a very good way of testing for all reasonable permutations that the software may enter (including all the alternative courses). Additionally, a good source of individual test cases is the alternative courses in the use cases. (In fact, we regard testing the alternative courses as an essential way of making sure all the "rainy-day" code is implemented.)
Okay, with that out of the way, let's write a unit test. To drive the tests from the Control objects and write them from the perspective of the Boundary objects, simply walk through each sequence diagram step by step, and systematically write a test for each controller. Create a test class for each controller and one or more test methods for each operation being passed into the controller from the Boundary object.
Looking at the sequence diagram in Figure 3, we should start by creating a test class called CustomerDetailsValidatorTest, with two test methods, testCheckRequiredFields() and testCustomerNameUnique():
package iconix;
import junit.framework.*;
public class CustomerDetailsValidatorTest extends TestCase {
public CustomerDetailsValidatorTest(String testName) {
super(testName);
}
public static Test suite() {
TestSuite suite = new
TestSuite(CustomerDetailsValidatorTest.class);
return suite;
}
public void testCheckRequiredFields() throws Exception {
}
public void testCustomerNameUnique() throws Exception {
}
}
At this stage, we can also draw our new class diagram (starting with the domain model as a base) and begin to add in the details from the sequence diagram/unit test (see Figure 4).
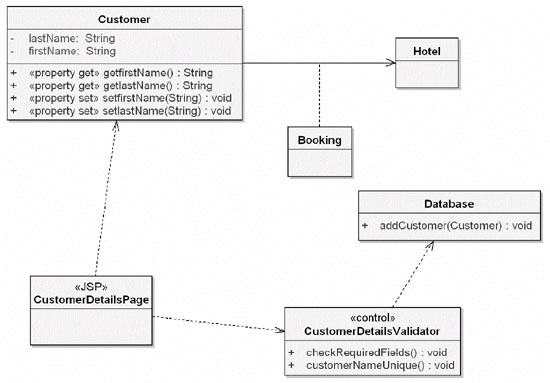
Figure 4. Beginnings of the detailed class diagram
As you can see in Figure 4, we've filled in only the details that we've identified so far using the diagrams and unit tests. We'll add more details as we identify them, but we need to make sure that we don't guess at any details or make intuitive leaps and add details just because it seems like a good idea to do so at the time.
TIP: Be ruthlessly systematic about the details you add (and don't add) to the design.
Page 1 Page 3 Back to the archive list
This article was originally published in the Spring 2005 issue of Methods & Tools
|
Methods & Tools Software Testing Magazine The Scrum Expert |
Copyright © by 1995-2025 Martinig & Associates |
Privacy
Follow Methods & Tools on


